Pressurized Do-It-Yourself Brake Bleeding
by Claudio Sanchez
Bleeding air out of hydraulic brakes system should be simple. In spite of that it
is regarded as a black hole by beginners and, every now and then, trips up even experienced mechanics. Here are few words of wisdom gained through
experience.
The pressurized approach works very well because it pushes the brake fluid out
of the reservoir and into the system. In this manner, it is very unlikely to
create air bubbles in the system. When small air bubbles form in the brake
lines, the entire system suffers as the brake pedal becomes soft. This is
because air is much more compressible than the brake fluid. When you push on the
pedal, the air trapped in the lines acts like a spring inside of the system. The
air becomes compressed, absorbing energy from the system, instead of directing
the energy towards pushing the caliper piston against the brake disc.
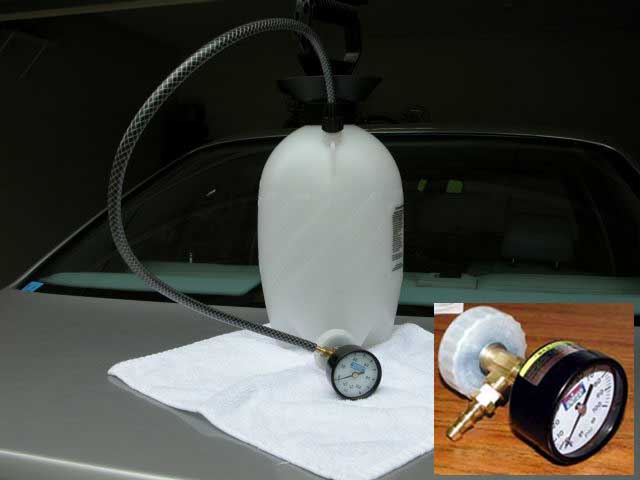
This brake-bleeding tool is for DIY [Do-It-yourself] or professionals. The
pressure bleeder is the best tool to bleed your brakes without any effort, and
simple to do. The gauge came from Bruno [most of you know Bruno [racingking.net]
from Roadfly.org message board] and air pressure tank [sprayer] from a hardware
store for less than $9 [For details see pictures].
Bleeding instruction:
I have a 3½ ton jack and four jack stands. Always, place a jack stand at each
designated point by BMW. Then move around to each wheel until you have the whole
car up on four jack stands, and remove all four wheels for clearance. This
provides easy access to bleeder nipples or valves on calipers. Brakes are best
bled with new disc brake pads that are fitted and adjusted correctly [I
purchased my parts from BMA Imports.
-- see www.e38.org for a list of suppliers].

The key to brake bleeding is doing it s-l-o-w-l-y because fast pumping will
only add air to fluid. Always, when you are bleeding the system, start with the
wheel that is farthest away from the master cylinder, and then work your way
back towards the front left wheel. In other words bleed the system in this
order: right-rear, left-rear, right-front, left-front. Bleeding in this order
will minimize the amount of air that gets into the system. Always bleed each
caliper more than once, because bleeding the other calipers can dislodge air
into the system. You might be surprised that after 5 times around the car there
still might be a little bit of air in the system. A good rule of thumb is the
more you bleed, the better your brakes will be.
During the bleeding process, it’s very easy to forget to check your master
cylinder reservoir. As you are removing fluid from the calipers, it will be
emptying the master cylinder reservoir. If the reservoir goes empty, then you
will most certainly add some air bubbles in to the system, and you will have to
start all over. Keep an eye on the fluid level and don’t forget to refill it.
Make sure that you always put the cap back on the reservoir. If the cap is off,
then brake fluid may splash out and damage your paint when the brake pedal is
released. This is a pressure bleeder system, make sure that you often check the
level of brake fluid in the bleeder reservoir so that you don’t accidentally run
dry.
As always [recommended], remove old brake fluid from reservoir. To remove old
brake fluid is done with a syringe or turkey baster, or any other method to suck
up old fluid, as always use fresh and clean brake fluid DOT 4 or Synthetic [DOT
5 is silicone based and these product may not be compatible with BMW brake
system and it should be avoided]. YOU MUST READ BMW’s brake fluid
recommendations.
You should routinely flush and replace your brake fluid every two years.
Deposits and debris can build up in the lines over time and decrease the
efficiency of your brakes. Regular bleeding of your system can also help you
spot brake problems that you wouldn’t necessarily notice simply by driving the
car.
PLEASE DISCARD OLD FLUID PROPERLY DO NOT DAMAGE THE ENVIRONMENT OR YOUR CAR'S
PAINT.
CAUTION:
DO NOT attempt to drill out, or use “easy-out" to remove broken bleeder nipples
or valves on brake calipers. [Recommended] I am believer at this point it is a
must to replace brake caliper(s) because resizing orifice does not work most of
the time.
WEAR GLOVES AND SAFETY GLASSES TO AVOID AN IMPROPER RELATIONSHIP WITH THE
FLUID. Make sure you have all your tools and supplies.
Questions and Answers
1. What is the purpose of the pressure gauge? Are we supposed to maintain
a certain pressure or watch for particular limits?
The purpose of pressure gauge is to maintain recommended the pounds per
square inch [psi]. The particular limit is due to avoid blown-up seals on brake
system such as master cylinder or calipers. Of course, at this rate brake
bleeding occurs in slow manner but accurately as professional equipment sold. On
the other hand, the key to brake bleeding is doing it s-l-o-w-l-y because fast
pumping will only add air to fluid.
2. Why is the pressure tank attached to the brake fluid reservoir? Is its
purpose to collect excess air or fluid? Or, is the purpose to force fluid into
the rest of the system and out of the calipers?
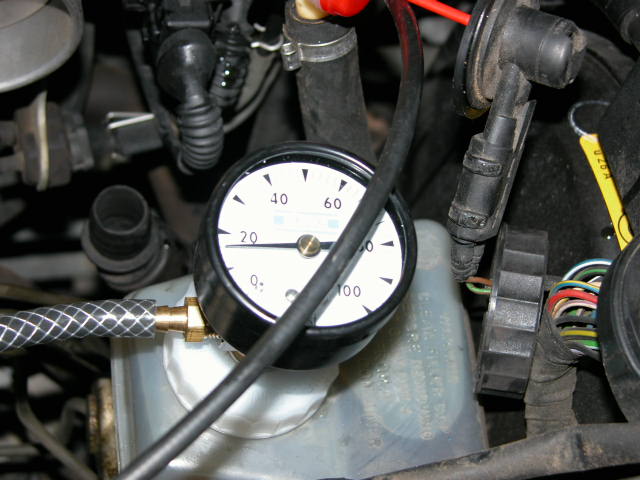
The pressure tank is attached to gauge which attaches to brake fluid
reservoir, after removing reservoir cap temporally. The handheld pump in the
tank is used to slowly increase pressure in tank and gauge prevents from
exceeding recommended pressure pounds per square inch.
3. How does one bleed the calipers?
First, this is a pressurize brake bleeding system, and it is necessary to
make sure that you often check the level of brake fluid in the brake master
cylinder reservoir so that you don’t accidentally run dry.
Fit a piece of clear tubing (to see bubbles and color of the fluid) over the
bleed screw nipple and run the hose into a clear bottle. Then, open bleeder
screw just enough [½ to ¾ turn] to get fluid flowing, and to stop fluid from
flowing, close the bleeder. You don't have worry about sucking air into the
lines through the bleeder threads, which lead to a spongy brake pedal feel.
Torque standard bleeder nipple to 53-86 inch pounds (about 5 foot pounds).
Repeat until clean, clear and bubble free fluid comes out. Don't let fluid in
the master cylinder reservoir go dry to avoid drawing air. In fact, as you are
removing old brake fluid from calipers, you will be emptying the master cylinder
reservoir. During bleeding process, it is very easy to forget to check fluid
level in reservoir. If the reservoir goes empty, then you will most certainly
add air bubbles into the system, and you will have to start all over. It takes
a lot of bleeding to get a large amount of air out of the system when air enters
at the reservoir, so be very careful. Also, keep an eye on the fluid level and
don’t forget to refill it when finished.
When finished, make sure to REPLACE the cap back on the reservoir. If the cap
is off, then brake fluid may splash out and damage your paint when the brake
pedal is released.
4. What does one do with the pressure tank when finished? Is it ok for air
to get into the brake fluid reservoir when removing the tank? I assume that it
is (how else would one add fluid?), but for someone who's never seen this done
it seems like a logical question.
It is a pressure bleeding system, and when finished [always] release air from
air tank by slowly unscrewing cap on air tank and not at reservoir. Then remove
gauge from reservoir. Again, make sure of the level of brake fluid in the
reservoir is normal or full, and it is very important to avoid accidentally run
reservoir dry.
It is very important when bleeding to do it in order: right rear, left rear,
right front, left front. Bleeding in order minimizes the amount of air that may
get into system. Always bleed each caliper more than once, because bleeding
other calipers can dislodge air into the system. Do not be surprised if after 5
times around the car there still may be a small amount in the system. As a rule
of thumb, the more you bleed, the better your brakes will be.
Return to e38.org